Metal Forming
(c) Antique Metalware Society
Small extracts can be used with acknowledgements to 'Oldcopper.org' website.
Helpful comments are very welcome.
Table of Contents
Cold Working, Holloware, Joints, Lids, Knops, HandlesManufacture of Hollowware
Joints for Hollowware
Arc Welding
Spinning
Deep drawing
Spouts
Lids
Knops
Handles
Repairs
Re-riveting handles
Re-soldering joints
Knocking out dents
Flattening the bases of trays and hollowware.
Machining
Joining
Screws, nuts and rivets
Bimetallic Corrosion
Corrosion Susceptibility of Metals
Soldering
Choice of Fluxes for Soldering
Copper, solid or plates, tin-bronzes, gunmetals
Commercial brasses
Aluminium Brasses
Resistance soldering
Silver Soldering and Brazing
Welding
Cold Working, Holloware, Joints, Lids, Knops, Handles
Examples of methods used to fabricate cold are typically:
- Cold rolling, used to make sheet, strip and foil.
- Bending
- Stamping from sheet or strip, used for the production of small components in quantity.
- Spinning, used for the manufacture of vessels, small saucepans and dished items.
- Deep drawing using punch and die to make deep cupped items.
- Cold drawing for the manufacture of round and shaped wire.
- Tube drawing to give solid drawn (seamless) tube.
- Forming strip to a round section to give a seamed tube.
- Thread rolling.
- Machining.
Until the cold rolling mill was invented, plate, sheet and strip used to be made in a ‘battery’, consisting of hammers powered by water or steam engines. Flat castings were hammered and annealed alternately until as thin and flat as required.
Manufacture of Hollowware
The way in which hollowware such as saucepans, kettles and dishes have been made is a good guide to quality, age and durability. Methods differ between craftsman coppersmith and quantity production and have changed through the years. Both can achieve fitness for purpose and both methods have always had to be made at a price to suit the market. The production techniques involved can include cutting, raising, seaming, deep drawing, spinning, brazing, welding and riveting. For cooking utensils, the insides are frequently tinned after manufacture. Some recent production is of course intended only as interior decor rather than being for serious use.
Joints for Hollowware
Hollowware has to be produced as a three-dimensional vessel from flat sheet since neither casting nor hot forging are usually economic options. Methods have developed significantly through the centuries and these are generally obvious in the finished product. Initially, the basic need is to form the sidewalls and join them to a base. Spouts, handles and lids are fitted as needed. Traditional techniques involve cutting out copper sheet to form the sidewall, forming it to cylindrical shape and making a joint.
A brazed butt joint is not strong enough so an overlap must be used to give a bigger contact area for the join. A simple overlap is still not strong enough to take a battering in service, so the coppersmith’s technique is to make what appears to be a ‘cramped’, ‘dovetailed’ or ‘castellated’ joint. This involves forming a feathering by hammering the edges of the sheet to about half their original thickness and then cutting slits at right angles to the edge. These are bent out alternately and mated with the edge to be joined. The flaps are then hammered close to give a good friction fit that can be sealed by brazing. Note that the description ‘Dovetailing’ gives a joint of different type to that found with wood. The dovetails are not keyed together but overlapped and cramped as described.
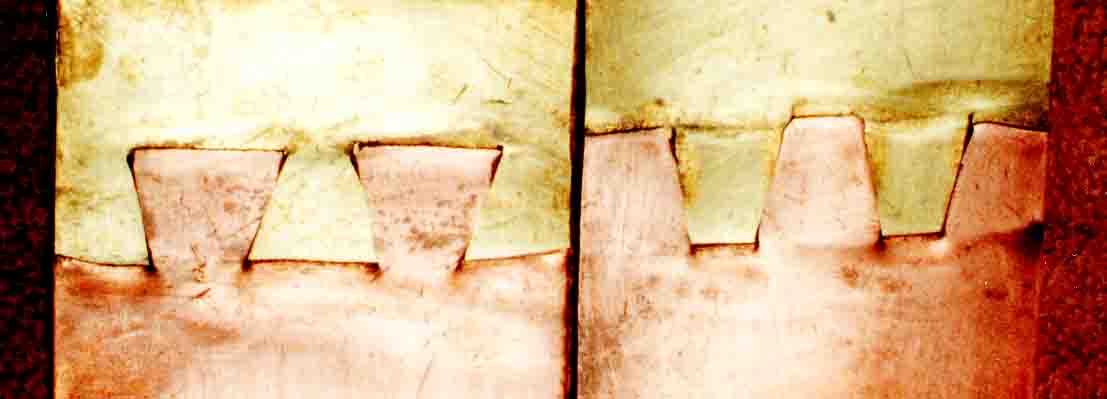
The two sides of a cramped joint showing that the ‘dovetailing’ is not the same joint as in woodworking. Copper and brass have been used for the photograph for contrast.
 A lockseam before soldering.
Final finishing is by planishing the joint surface flat, so that it is the same thickness as the parent metal sheet. Normally, any handles or spouts are positioned to hide much of the sidewall joint.
As metalworking production techniques improved during the later 19th century it became possible to make tools to cut a regular castellated edge to copper sheets. This made joint making a much quicker and cheaper process. The serrations are usually closer spaced than hand cut joints.
To fit the base to the sidewalls with good quality smooth joints it is necessary to either bend up the circular base to fit the sidewall or bend the sidewall under to allow the base to be let in. The second technique keeps the brazed joint out of sight under the vessel. These methods were used commercially in Europe and America until around 1900. The technique can still be used and is still seen on some modern imported products, frequently not of such good quality.
Improved machines have made it possible to make deeper and deeper vessels out of one piece of flat sheet by deep drawing or spinning.
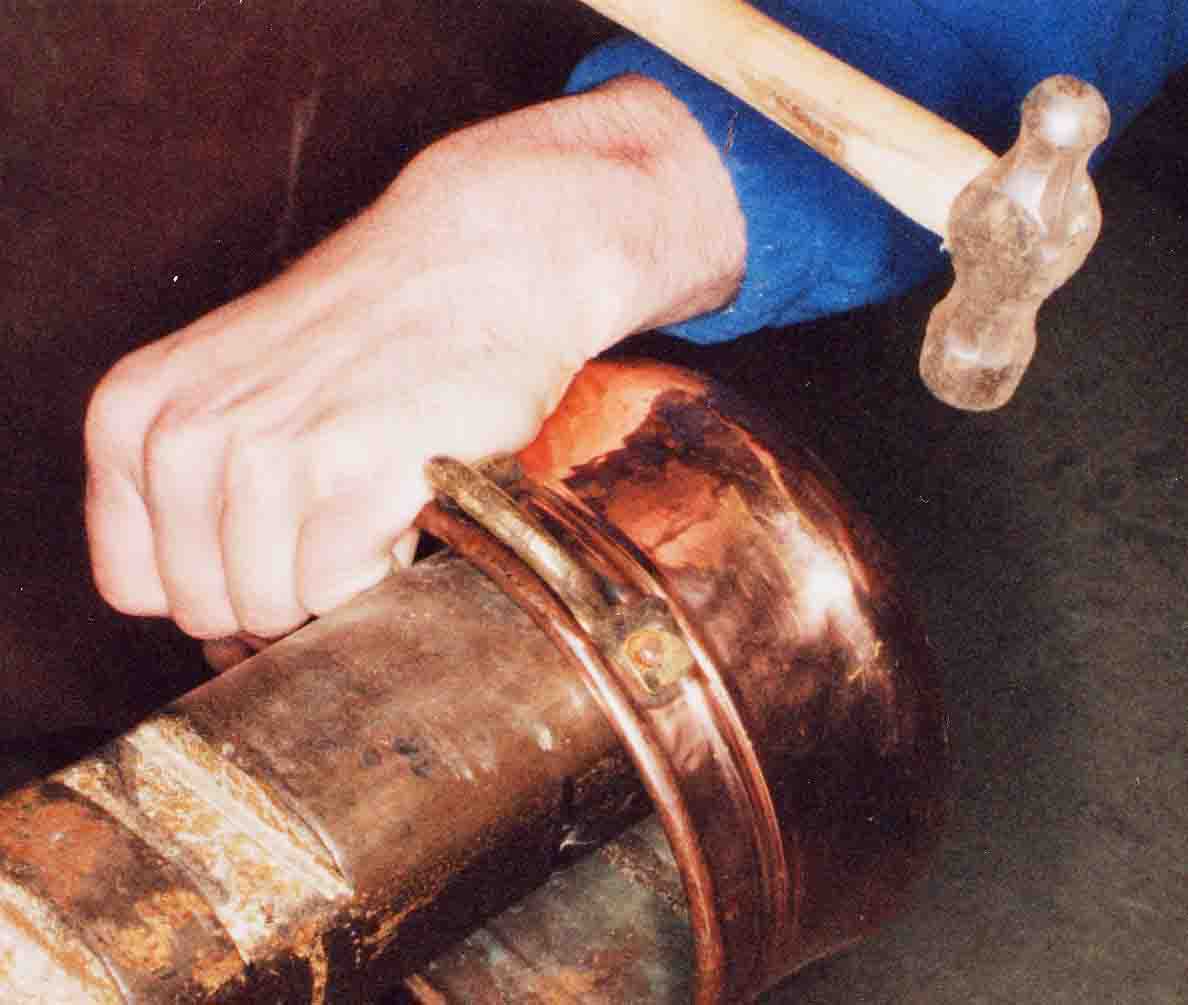
Another way of making joints is by using lockseams. This can be done by hand or machine and involves folding over a narrow strip of metal from each of the pieces to be joined, interlocking them, and soldering the joint to make it permanent and watertight.
Arc Welding
can now be used for making butt joints in thin metal for holloware. Initially the development work was as an automated process to speed up the manufacture of domestic hot water cylinders. Having succeeded for light duty pressure vessels, the technique is now also used to help make holloware. Weld dressing is needed to give two good smooth sides to the joint. Modern copper cookware suitable for heavy duty usage now shows no joints in the sides of the vessels.
Spinning
is a craft that developed when it became possible to keep a lathe revolving in one direction rather than use a bow string to drive it in alternate directions. A flat disc of metal is clamped against a shaped former held in the chuck. While this rotates, a wooden tool is held against it and pressure is applied to gradually form the disc to the shape needed. Bowls are easily made and vessels with parallel sides are possible within limits. Spinning marks are left by the tool, these being circumferential.
Deep drawing
is now used to produce many straight sided vessels.. This process also starts with circles that are held between two pressure plates while a shaped punch forces the metal through the centre of a die in one of them. As the drawing takes place, the sides of the vessel are formed by being drawn between the punch and die. Longitudinal drawing marks may well be evident, though with good lubrication and unworn dies they should be minimal and easily polished out. Frequently traces can be still be seen. The original rolling marks may still be seen on the un-deformed base of the vessel.
Where joints may still be needed in the production of deep modern copper cookware, overlap and brazing has been replaced as a jointing technique by mechanised arc welded (MIG - metal-inert-gas) butt joints. Even after weld dressing, feint traces of the joints may be evident but do not affect the fitness for purpose of the products.
Spouts
Spouts are traditionally made from flat sheet by cutting a suitably shaped tapering flat, forming it round and joining. Allowance for significant bends can be made during sheet cutting by allowing for more metal where needed. The joined tube is then planished over suitable formers. To fit to a kettle body, a spout is fitted over a spigot formed as the hole is cut. This gives a good friction fit that can be sealed by hard soldering. The hard solder (silver solder) has a lower melting point than the brazing filler and means that during assembly and during any repairs, the main body joints do not come undone.
An alternative way to make spouts is to start with solid drawn tube (called ‘solid’ because it is seamless, being made by drawing from a tubeshell that was extruded from a solid billet). This can be formed over mandrels to give a taper and also bent to designed shapes.
Lids
Like the bodies, lids of kettles are made from two pieces of metal to give both the raised or domed shape and the skirt that is a good fit in the mouth of the body.
Knops
The quality of the knop on the lid of a kettle or jug is used as a guide to overall quality. A good job deserved a good knop as finishing touch. Designs were many and varied but early ones were frequently of a shape cast to represent an acorn, with good attention to detail. An insulating cloth was always used to hold the knop of a kettle just taken from the fire, a lesson soon re-learned the hard way if forgotten.
Wood was sometimes used if a knop of low heat conductivity was needed. This needed renewal at intervals. The advent of plastics superseded wood once heat resistance was assured.
Handles
Handles for kettles might be made in several ways:
A copper tube sandwiched between handle supports made of brass castings
(Pic)
A tubular handle made in the form of an oval bent up from brass strip and secured directly to the kettle body.
(Pic)
A strap handle made up from brass strip and secured directly to the body.
(Pic)
A wooden handle held between the handle supports by a rod passing through the centre and having decorative securing nuts at each end.
(Pic)
Repairs
Copper and brassware can suffer damage in use and be repaired to be fit for service. The repair may be obvious or, if done with skill, the item can look as good as it did when new. There is a long tradition of servicing cookware when needed. Indeed, during a visit to the company that had the Royal Warrant for supply of copper cookware, we were told that during a 25 year period, no new items had been needed. It was sufficient to visit each household once a year to repair damage and re-tin the interiors. One saucepan that had been squashed flat by a service lift took more work than usual but was restored to ‘as new’ condition without serious problems.
Mostly, the repairs needed can be described as:
- Re-riveting handles
- Re-soldering joints
- Knocking out dents
- Flattening the bases of trays and hollowware.
All of these can be done by a skilled coppersmith. Some are within the capability of skilled amateurs such as modelmakers.
Re-riveting handles
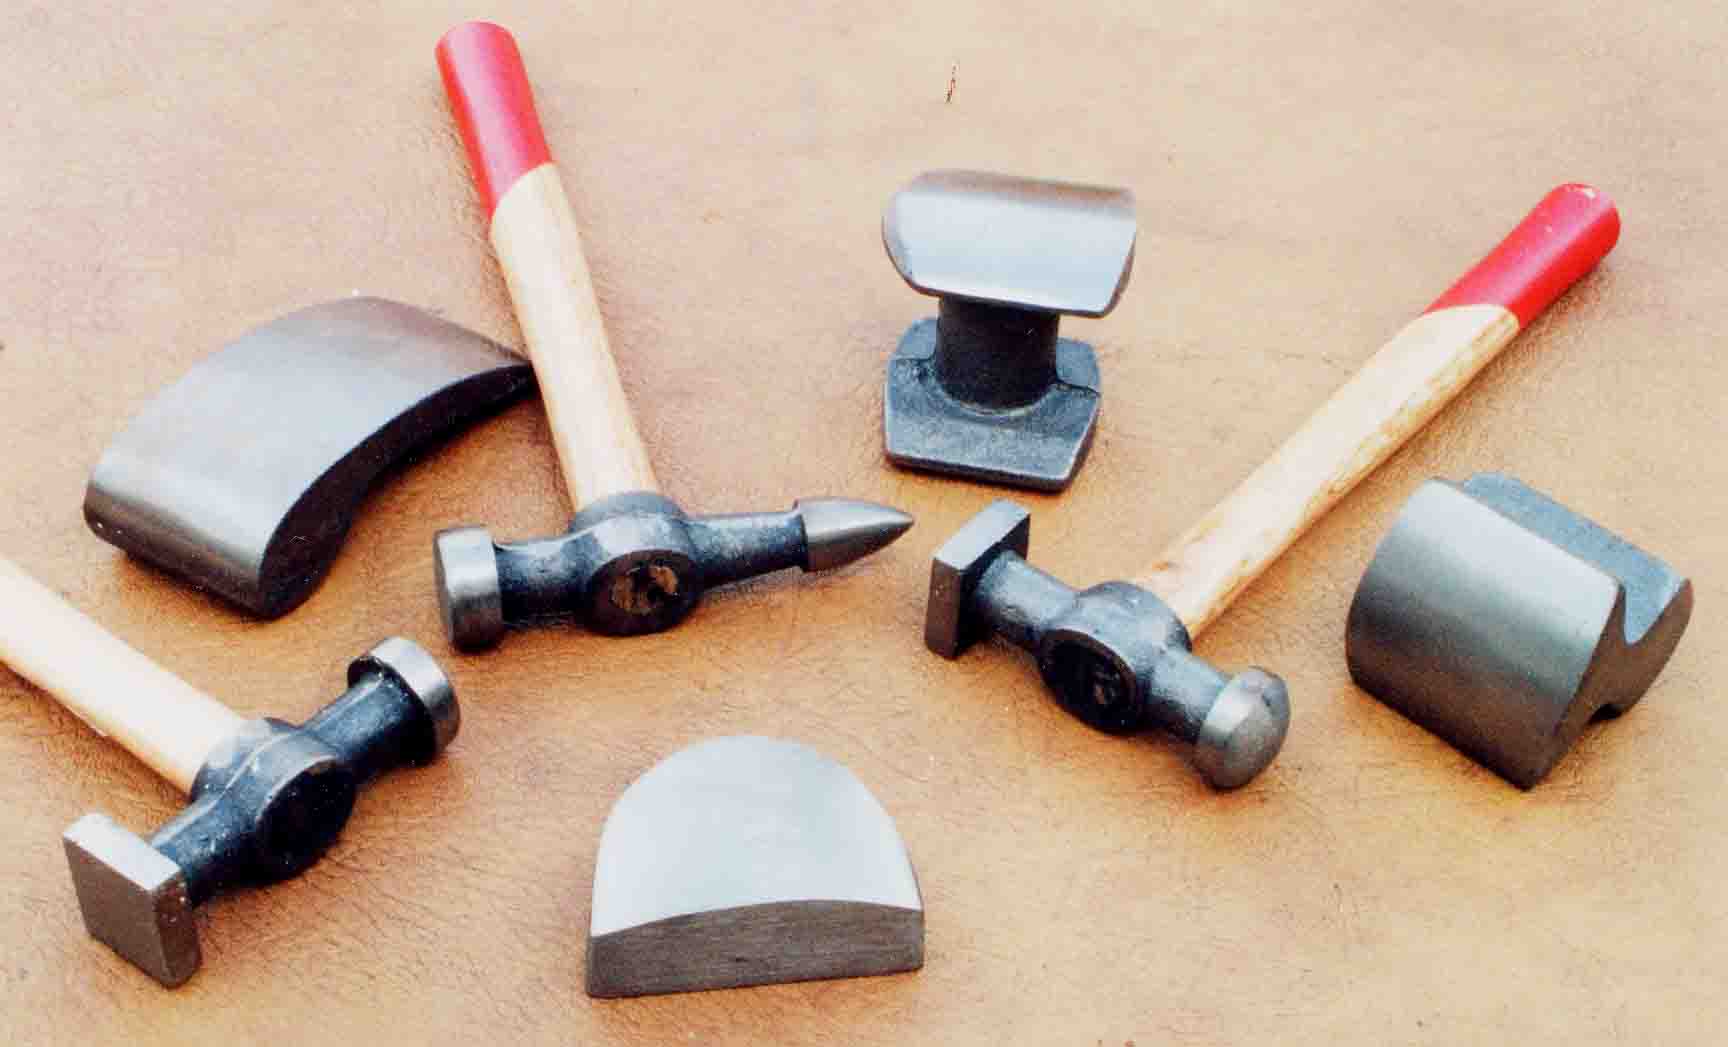
Equipment needed includes a good firm anvil, parallel punches of the right diameters for drifting out old rivets, suitable hammers and a supply of copper rivets together with the metal finishing kit. The anvil needs to be radiused if used for hollowware such as jardinières. A shaped steel bar securely fixed to the workbench should project out far enough to accommodate the job. The rivets must be copper or brass to prevent bi-metallic corrosion. Steel and aluminium both corrode preferentially when in contact with copper.

A useful range of punches for knocking out old rivets.
An anvil with rounded top is best for the re-riveting work.
Re-soldering joints
Soldering is one of the easiest joining techniques providing the usual recommendations described above are followed. For repairs especially, the most important requirement is thorough cleanliness. If it is not possible to get a joint clean before soldering, no amount of flux, heat and solder will effect the repair. One of the biggest problems is trying to mend joints where the metal has been wrapped round a steel re-enforcing wire. This is usually corroded inside the joint and it is very difficult indeed to get the rust out before trying to re-make the joint.
Knocking out dents
It is easy to knock out dents in hollowware but also easy for the unskilled to leave the surface resembling that of the moon. The tools and skills of a panel-beater are needed. Obviously it is best to practice first on something of little value. The amateur should check out text books on coppersmithing and obtain suitable hammers, mallets and backing blocks. Where the mouth of a vessel is restricted it will be essential to use a strake of the type recommended in the literature. A good result can be very satisfying. For copper and brass always have one hard and one soft tool - use a soft mallet on a hard anvil or hard hammer on wooden block.
If a set of coppersmithing tools are not to hand, dents can be knocked out using hand made formers.
- To give some backing to the inside of a vessel, make a former from steel or one or more layers of plywood.
- Either shape this to the curvature of the vessel or make a pad on the end using a pad of epoxy putty or ‘chemical metal’.
- Let this set while the pad is lightly pressed against a good part of the vessel (oiled with a suitable parting layer to prevent adhesion).
- Clamp the former in a good vice, rest the vessel over it with the dent against it, and gently beat out the hollow.
- Start with a hide mallet and progress through gradually harder mallets to finish the job. Wood, copper and steel are the ones to use, each being free from bumps and dents likely to ruin the metal. The copper and steel should be near mirror finish.
- Having knocked out the dent, remove the remainder of the bruising with abrasive such as fine and very fine wet-and-dry silicon carbide paper, used wet.
- Finish polish.
A goup of hammers and anvils that is sold for automotive panel beating repairs. Individually they can be useful for copper provided each is used against a soft mallet or soft pad.
Flattening the bases of trays and hollowware.
Most hammering makes metal thinner and expands its area. When flattening metal it is essential to reduce the area back to that of the original flat surface. This can be done with the use of planishing hammer on a hardwood block or plastic surfaced worktop. There is quite an art in working round the affected area to remove the dents. If successful, the repair can be regarded with justified pride.
Machining
Machining of all coppers and copper alloys can be carried quickly, accurately and with a smooth surface finish using conventional techniques. Some are more easily machined than others. Unalloyed copper and brasses that are meant only for cold working are not the easiest of the range to machine but are still markedly better than many other metals and materials. Special additions to improve machinability can be made to copper and brass. Leaded brass is the easiest of all metals to machine. The standard material is said to have a machinability rating of 100% while an improved version, high speed machining brass, is rated at 150%. This is the material from which most extruded rod is made. Hot stampings and most castings are also made of leaded brass and are cheap and easy to finish machine. With such a low cost for machining, they can be used to manufacture fully finished components with a cost much less than that of others made from materials of lower initial cost. Machining swarf has a good value and the recycling of this scrap also helps to keep component costs low. This is why, for example, small brass machine screws are cheaper than steel.
Additions of lead, sulphur or tellurium can be made to copper to give material of improved machinability. These are used extensively in the manufacture of shaped components for electrical equipment and for copper welding nozzles for special purposes that are drilled with many fine holes.
While good results can be obtained with general-purpose tooling, it is useful to check on recommended guidelines for tool geometry, speeds, feeds and lubricants if best practice is needed.
More information:- 'Machining Brass, Copper and its Alloys’, V. Callcut & A Segal,CDA Publication TN44
Joining
Joining of copper base materials can be easily achieved by a very wide variety of techniques. That chosen will depend upon factors such as speed, cost, required joint strength, conductivity and corrosion resistance. Techniques available include arc welding, brazing, silver soldering, soft soldering, mechanical joining and the use of adhesives.
Joining copper and copper alloys with adhesives is possible provided that recommended materials are used. Some adhesives do not adhere well and are not recommended for use with these metals. Manufacturers’ advice should be sought and followed. Generally it is essential to roughen the surface and ensure it is totally clean to ensure a good grip.
Screws, nuts and rivets
All copper alloys can be drilled for rivets, bolts or machine screws. Riveting is a traditional way of joining metal to make larger, three-dimensional products and is capable of forming the securing link in joints that can be watertight. Boilers and other pressure vessels have been successfully made using this technique for many years. For joints that may have to be dismantled at sometime, bolting or drilling, tapping and inserting screws is a technique nearly as old.
Ideally, fasteners such as these should be made of similar material to the parts being joined. Early coppersmiths made their own rivets by bending up an off-cut of copper in to a round shape that would fit the hole and form a rivet when headed. Later, stocks of drawn wire became available from which rivets could more easily be made. Since most articles are likely to be used in humid or wet conditions, the similar metal is essential to avoid dissimilar metal corrosion effects. Since brass is much quicker and cheaper to machine than steel, the cost of brass fasteners should be competitive.
Bimetallic Corrosion
When joining metals, care must frequently be taken to ensure that only similar metals are joined and that fasteners are compatible with the main components. This applies where the completed joint may be used in a corrosive (wet or damp) environment. Some metals corrode more easily than others and are said to be more ‘noble’. Metals have been listed in order or descending nobility. Gold and platinum are amongst the most noble, silver excellent, copper and copper alloys are nearby, iron, steel and aluminium are well down the list.
If dissimilar metals are exposed together in a damp environment, the metal that is the least ‘noble’ will corrode preferentially. Therefore, if a steel screw is used to join copper or brass items, the screw will quickly start rusting if damp. When iron nails were used to fix copper sheathing on the bottoms of ships, the nails soon corroded and the plates were lost. The use of copper nails stopped the problem.
Rust occupies a much bigger volume than the steel from which it comes and this causes problems such as jamming of fasteners that cause endless trouble.
Corrosion Susceptibility of Metals
Most susceptible to corrosive attack (less noble)
Least susceptible to corrosive attack(more noble) |
|
Magnesium and its alloys |
Zinc and its alloys |
||
Aluminium and its alloys |
||
Mild steel |
||
Cast iron |
||
Stainless steel, 13% Cr, type 410 (active) |
||
Lead-tin solder, 50/50 |
||
Stainless steel, 18/8 type 304 (active) |
||
Stainless steel, type 316 (active) |
||
Lead |
||
Tin |
||
Brasses |
||
Gunmetals |
||
Aluminium bronzes |
||
COPPER |
||
Copper-nickel alloys |
||
Titanium and its alloys |
||
Stainless steel, 18/8 type 304 (passive) |
||
Stainless steel, type 316 (passive) |
||
Silver |
||
Gold |
||
Platinum |

In most domestic circumstances, stainless steels are compatible with copper and copper alloys. (Stainless steels are normally passive, being used in environments with plenty of air available. In crevices where air is excluded, the surface may become ‘active’)
Ref:- Brasses for Corrosion Resistance: - CDA Publication No 117 section 7
Ref:- Selection Table: Corrosion Resistance of Copper and Copper Alloys. CDA Publication No 106
Soldering
This is one of the easiest ways of joining copper and brass and involves wetting the metals with a low melting point solder that is solid at room temperature. Provided that the metals are clean, well fluxed and that sufficient heat is used, there will be no problems. Anyone who has become used to soldering electrical circuit boards will need to become used to the greater amount of heat needed to get a bigger mass of metal up to soldering temperature.
Due to the relatively low strength of the filler metal compared with the copper and copper alloys being joined, butt joints are useless. Lap type joints should be used to give plenty of areas in near contact for brazing joint design. This ensures an adequate area of filler metal to carry joint loads. Such joints need three conditions for successful soldering, good joint design, good flux and the correct heating techniques.
To get a good strong joint there should be a thin layer of solder between the two pieces of metal to be joined. This means setting up the joint for soldering with a correct joint gap. Clearances of 0.07 to 0.25 mm are recommended between overlapping parts with approximately 0.1 mm being optimum for capillarity and joint strength. During soldering and solidification there should be no relative movement between joint faces and the use of jigs, self-locating designs or temporary solder-tagging is therefore recommended. These methods should not, however, act as local heat sinks that then prevent efficient soldering.
Chemically clean metal surfaces are obtained by degreasing, mechanically abrading and using a suitable flux. The earliest and most active fluxes are those water-based solutions such as the original `killed spirits', zinc dissolved in hydrochloric acid, latterly with additions of ammonia and perhaps alcohol and/or a detergent. While very effective on the common metals such as steel, tinplate, copper and brass, they are also very corrosive if not washed-off thoroughly immediately soldering is completed. Diluted orthophosphoric acid is also used for some applications, especially for the low melting point solders.
Subsequently, organic-based fluxes have been developed, now forming four main groups, resin, synthetic, synthetic resin and water-based organic fluxes. Synthetic resin fluxes are now made with a low solids content which minimises the need for cleaning and the latest water-soluble organic fluxes combine the best of soldering results with ease of washing clean. The choice of flux is influenced by many factors including type and mass of metal to be soldered, cleanliness, heating techniques, type of solder and after-cleaning requirements. For example, the use of torch soldering techniques will require the use of a more active flux to deal with the extra tarnish caused by the flame.
Correct heating is needed to allow the molten filler to flow and completely fill the joint. Direct heating by torch flame is common. Some experience is useful to prevent overheating the joint which causes oxidation and prevents bonding. Initial heating around the joint allows the whole job to come up to temperature evenly before getting the joint area up to temperature for melting of the solder.
The use of soldering irons is favourite with coppersmiths for most jobs, the size of the copper bit of the ‘iron’ being chosen to provide the heat needed by the job and matched to size of the joint required. These used to be heated by blowlamps. Many types of iron have been made for special needs and the collecting of blowlamps and irons is a special enthusiasm. Electric soldering irons are now general but still the size has to be matched. Irons are rated at 5 to 65 Watts and a range of these tools is useful. Instant irons and resistance soldering are also useful techniques.
Choice of Fluxes for Soldering
Before fluxing, metal to be soldered must be clean, oxide free and free of non-solderable coatings such as grease, chromium or lacquer. It is better to spend time thoroughly cleaning and degreasing a job before trying to make a joint than to spend ten times as much time afterwards trying to rectify it.
Copper, solid or plates, tin-bronzes, gunmetals
With red oxide tarnish, can be soldered with mildly activated resin. Apart from the use of abrasives, black oxide is only removable with activated resin, organic acids or zinc ammonium chloride solutions.
Commercial brasses
Use activated resin if tarnish is thin. It is impossible to solder, even with inorganic flux, if significant oxidation is visible, due to surface film of zinc oxide.
Aluminium Brasses
As with aluminium alloys, a refractory film of oxide forms on the surface. This must be controlled with active fluxes recommended for the application.
Resistance soldering
This is a well established technique that has been used for many years, particularly in the jewellery trade where, for example, localised and fast heating is necessary to prevent damage to gemstones. The upsurge in modelling using brass and nickel-silver by both professional and hobbyist has seen increasing use of the technique.
The essential difference between this method of joining two metal surfaces together and conventional soldering techniques is that the heat is generated by passing an alternating current through a previously tinned and fluxed or solder painted joint. The advantages include relatively fast and controllable application and removal of heat, localised heating and, if a non-metallic electrode is used, absence of excess solder on the external surface of the work. Also, the electrode(s) can hold the workpiece until the solder has frozen because the current is normally switched at source. A return path for the current has to be established, the workpiece will have a wire or another electrode connected at some convenient place with a resistance low enough to avoid significant heating.
Silver Soldering and Brazing
Brazing depends on the ability of the filler metal to penetrate, by capillary attraction, small gaps between the metal surfaces to be joined. Under suitable conditions the brazing alloy wets and bonds by surface diffusion alloying to form a strong joint. . For the manufacture of many domestic copper items, joining by brazing has been used for centuries. To obtain good strong joints with long lines of contact, coppersmiths use several techniques.
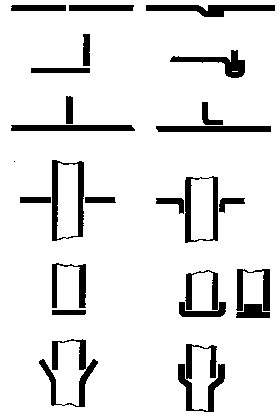
Some joint designs for brazing that give good results
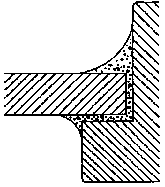
A brazed joint sectioned to show the joint filling.
For joining up strip to make cylindrical vessels or to let in the bottom of a pan, ‘cramping’ was standard and can still be carried out as described above. The joint is ductile and further work finishing with a planishing hammer gives a joint detectable only by the very thin zigzag line of brass-coloured braze metal.
Cutting metal in a castellated pattern to allow dovetailing (see above) also gives a good joint. The joint line is then identical on both sides of the copper instead of the alternate effects given when cramped. When the joint does not have to be smooth, it is simplest to turn over the edges and interlock them mechanically before soldering.
The three most important conditions to achieve an effective bond are:
-
The provision of a mechanically and chemically clean metal surface, normally accomplished by filing, abrasion with wet silicon carbide paper. When brazing in air a flux is needed that retains the oxide-free surface over the brazing temperature range.
-
The provision of the correct joint gap for the particular brazing filler metal.
-
The establishment of the correct heating pattern so that the filler metal flows up the thermal gradient into the joint.
The design of the joint for brazing is radically different from that for welding or bronze welding. Under the right conditions, penetration and bonding does occur with alloy flowing through the joint to the extent that a fillet of brazing alloy forms on the inside is more clearly seen from the diagram of the same component in Figure 3.
The most commonly used brazing filler metals for copper and its alloys are the copper-silver-zinc silver (or ‘hard’) solders. Copper-phosphorus is a self-fluxing alternative for use on copper at higher temperatures. In a well-designed, properly made joint, the mechanical strength of the finished joint will exceed that of the parent metal when the joint is stressed in shear. This takes full advantage of the surface area of bond between brazing metal and parent metal. The metal anneals at the brazing temperature and properties normal for the ‘hard’ condition are lost.
Welding
Acetylene torches can be used with care for heating tube, cylinder and boiler copper and copper alloys for brazing but are not normally recommended for good quality welding. Arc welding using an inert gas shield is the usual process.
Ref: - 'Joining of Copper and Copper Alloys’, L. Brown, CDA Publication 98.
After